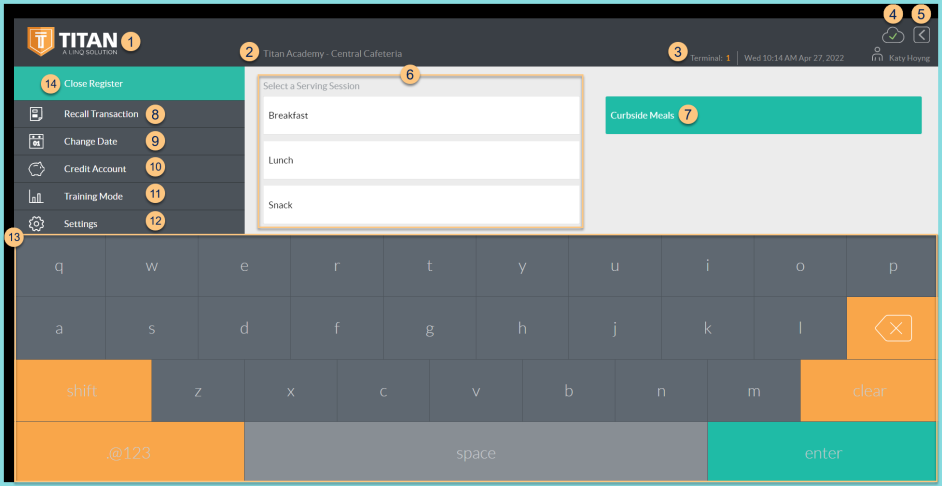
POS Home Screen
pos.titank12.com
-
TITAN Logo - click to enter full screen mode
-
Notice the District Name and Cafeteria Name
-
Notice the Terminal Number, Date, Time, and Cashier Name
-
Cloud Icon - notice the status of the cloud icon
Green Check - connected to cloud
Gray Dash - not connected to cloud
Orange Exclamation mark - device is not receiving a full download of the student database
Red Number - number of transactions saved in browser for communication when connection returns -
< - click to log out
-
Serving Sessions - select a listed serving session to be redirected to the default serving mode screen (PIN, Photo, or Buffered). Note: The serving session must be available and published at the cafeteria to be displayed here.
-
Curbside Meals - click to be redirected to the PIN Mode Screen for curbside serving. Note: this is only displayed if enabled.
-
Recall Transaction - click to be redirected to the recall transactions screen.
-
Change Date - click to change the date

-
Select the date for which to enter meals (Default: Today).
-
Past Month - click to scroll to previous months
-
Next Month - click to scroll to future months
-
Okay - click to change the date
-
X - click to return to the previous screen without saving
-
Credit Account - click to be redirected to the credit account screen.
-
Training Mode - click to put the POS in Training Mode. The screen will get a training mode border and title, and no data will be saved to the cloud.
-
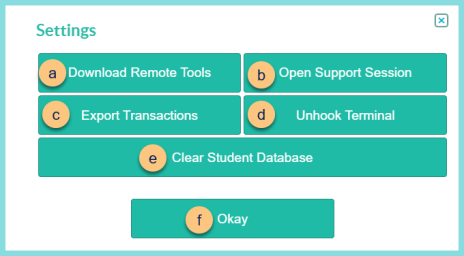
Settings - click to open the settings menu
-
Download Remote Tools - downloads the Screenconnect client executable file and allows access at any time by TITAN Staff. Note: If screenconnect has not been used on the device before, the customer will need to open/run the executable to be able to connect. Depending on how the district has setup their access for users, IT may need to execute the file under a login that has admin rights.
-
Open Support Session - If the Screenconnect client has been successfully installed, this option will open a one-time screenconnect session in a new tab of the browser, ready for the unique number to connect.
-
Export Transactions - Exports transactions from the device into a JSON file that is downloaded and placed in the Download folder on the device. Note: Use this option if there is no way to get a device back online and it has transactions stored in the TITAN cloud icon. The JSON file will need to be imported into TITAN to bring transactions into the system.
-
Unhook Terminal - Releases the POS license from the terminal without forgetting the POS ID. Note: Use this option if the user wants to use one license on multiple devices.
-
Clear Student Database - Clears the students from the cache on the device. Note: Use this option when cashier is not seeing a student at the POS but in the portal the student is there, and appears to be correctly enrolled and available. This may also be used when a device will no longer be used for serving to clear any student information from that device.
-
Okay - click to return to previous screen
-
Keyboard - use the touchscreen to type in lieu of a physical keyboard. Note: click the bottom left corner of the ABC/.@123 button to access the Developer Menu
-
Close Register - click to be redirected to the Close Register screen